BMW F800 Forum banner

F800GT full LED headlights system

52K views 112 replies 39 participants last post by  theSpeedRacerX  
#1 ·
Hi everyone,

just wanted to share with you a small mod I did lately..

Basically, the context was that although being very happy with my F800GT I condider the original kighting system to be very average.
I decided to improve it and I initially fell in the trap of trying "white" halogen bulbs which were barely better that the stock bulbs. This was clearly just an expensive bandaid type fix.

I needed to achieve two goals:
First, an overall light quantity increase to spread the beam further and potentially wider
Second a color temp shift towards a white light to help being noticed by other road users, in the lane filtering context in particular.

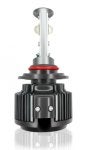
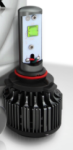
So I decided to try some LED H7 bulbs such as these:

They come with a ballast, an optional can bus error filter, and the harness. They feature an internal heat sink and a high speed fan to cool them down. The whole system is waterproof and nicely manufactured.
I ordered them in H7 format which is what is mounted on the F800GT as stock. The LED bulb flange is 100% identical as the stock H7 bulbs.

Upon reception, I mounted them in the headlight block, but I struggled a bit to clamp the spring wire retainer, as the LED bulb base is bulky. It carries the fan and the heat sink to there is a recess between the flange and the housing to clear the spring retainer, but not much. I used a small plier and after 5mn of struggle I finally locked them in place.

I connected them without the CAN bus error filter and I worked perfectly with a HUGE amount of light available. This is a chalk and cheese difference. There is no way I'm switching back to a halogen bulb, ever, period.

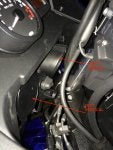
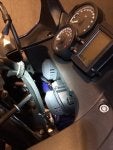
Now, since the back end of these bulb is more prominent that the stock halogen bulbs, I noticed that I can't put the lids back in place. See this picture about the stock lids:


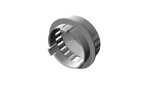
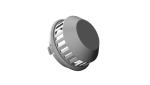
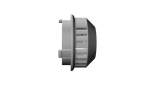
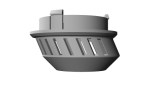
So I designed a pair of lids that would snap into the headlight block in lieu of the stock lids. Those would carry a emboss to clear the bulb back end, while being rain proof and providing the required venting, and cable clearance. I used Solidworks to create two digital models of the parts:

As you can see the right side is a bit different as it has to accommodate an existing 23° angle. The depth of each of them was defined based on the required clearance of the LED Bulb back end and the full left / right fork end point.

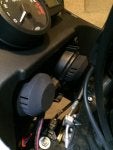
I then 3D-printed them online using selective laser sintering and got them in my mail 10 days later :)


They fit perfectly and give a nice industrial finish to the modification.

I use this config for about 6 weeks now and it went thru rain, cleaning, sun and wind without any issue so war.
I even changed the parking light for a led bulb to match the color temp and style; found a 5€ led bulb that did the trick and matched spot on.

Next step: a new SC project muffler on my GT in about 10 days, can't wait!

I hope this experiment may inspire some users to switch the LED lights, this is just fantastic!

Cheers,

Remi
 
#4 ·
Thanks Mark,
I don't have pictures of before, but here is how it looks with the leds on:

This is an iphone pictures, so the camera sensor didn't cope with the light..
I can do some more perhaps from outside and at a distance to show the light beam.

Emlevy,
the cost breakdown was the following:
LED H7 kit for two bulbs: 119 USD
3D printing of two caps: 50 EUR

Cheers,

Remi
 
#8 ·
Hi TRJL,

Well, there is a simple way to get that made for your F800GT: you could order them directly from the website that printed them for me. I used shapeways as I had good experience printing things with them so far.
I'd do a 10 bucks markup on each for the CAD work if this sounds all right.

That would look like this:
https://www.shapeways.com/designer/blueskip

Then you could order your bulbs on your own, the supplier is in the US.

Note: do NOT place any order yet as I want to upload an optimized version of the file.

Cheers,

Remi
 
#11 ·
Hi guys,

here we go,
I updated the files and they are available online:

https://www.shapeways.com/shops/remiepron

Feel free to give me any feedback.

BTW, here is a recap about how the cover works:

1) pull out the covers and use a dremel to trim the center material as described in the pictures. This takes about 5' to do, just wear eye protection.


2) snap in the cover and rotate it to get the alignment. The tab is located on the top side. Use some CA glue to lock the position.


3) install the bulbs and route the cables thru the dedicated cut out in each cover.
4) clip the modified covers on each side
5) attach the external ballast with double sided tape underneath the headlight block
6) connect to the existing power source
7) "let there be light" :)

for info, here is a section view that shows the space gained.


Cheers,

Remi
 
#55 ·
#15 ·
Hi Futterman,

the specs of the bulbs say 30w per bulb (current drawn based on 13.8v (our power generator output voltage) would be 30/13.8= 2.2Ah which matches the specs claimed by the manufacturer.

Kristoffer:
I was expecting something, but not a single flash of anything so far.
The kit includes an optional can bus error suppressor (basically a large capacitor in a piece of heatshrink to be placed in line as an extention) that you may use or not, upon the type of vehicle you drive/ride.
I tried with and without it and not a single flash of any kind. So I finally left those extra thingy on the shelve.

Cheers,

BTW I got mine from them: http://www.hidextra.com/razir-motorcycle-led-headlight-kit/
 
#18 ·
fantastic diy work ! I am also fascinated by the idea of 3dprinting, those things and services are getting real..for real afterall!
I have only one doubt : isn't there the risk of wet , humidity and thus condensation to easily slip inside and deposit on the front of the headlight with those openings in the modified caps ?
 
#19 ·
Hey Sam,
Agreed, this is hard leaving your sight from the road to go back and forth with a satnav screen located on the handlebar.

Emmanuele,
Thanks for the nice comments;
Regarding the condensation question, I think that humidity becomes a potential problem where a given amount of moisture saturated air is trapped in an enclosed space. In this case you have a free air flow that keeps circulating thru the fan and the vents, so trapping isn't an issue. For actual water intrusion, there are two things to consider: first, the LEDs and peripherals are 100% waterproof, so there is a very low risk of damaging them. Each connector is nicely sealed with a triple silicone lip seam. Second, although possible, the risk of having water going into the headlight compartment is reasonably low as I did as much as possible to locate the vents on the bottom part of the extensions, and I did angle them to reduce the risk again.

I did a couple car wash style cleanups since the installation. Beside it is raining cats and dogs everyday this month, so that helps as a good field test I guess :)

Cheers,

Cheers,
 
#21 ·
Hi Keith,

you are right, for the manufacturer I mentioned.
However, this is not a biggie since you can use any forwarder such as myus.com for example (this is the one I use on a regular basis, works fine with me so far). Basically they receive the parcel and forward it to you.
Alternatively you can pick another brand of bulb, as long as you can get a dimensions of them prior to the purchase.

I can only tell you about the Razir brand (the one I use) as they are freakin' amazing. Some other forum users may have useful experience with other brands?

cheers!
 
#27 ·
Here is a write up from my experiences in doing this LED install.
DO NOT expect to install these LED bulbs without taking a lot of plastic apart. It is probably possible, but for me I took the headlight assembly off.
First, I got the caps from Shapeways.com, which BlueSkip made (Remi). Use a dremel tool to remove the center material,
then glue them in place. I used a two compound liquid glue. This took less than an hour to complete.


Taking off all the plastic is not hard and only took me 45 minutes to complete. Here are the steps (from Blueskip):
"- remove the saddle
- remove the central cover from the airbox (fake tank alike) you DO NOT
-remove the two black plastic triangles (L&R) from each side of the gauges
-remove the low side fairings (L&R)
- remove the mirrors
-remove the up side fairings (L&R)
-remove the windscreen
- gently pop out the ambient air temp sensor support from the headlight block and leave it hanging from its harness
-turn CCW 90° the little running light support to remove it and leave it hanging from its harness
-gently pull straight out the headlight power connector (oval shaped) from the headlight block. It is connected between the two lights and has a 90° socket.
- unscrew the 4 screws that hold the headlight block onto the front structure. These screws are inserted from front towards the rear into some sort of aluminum clips. Warning: if you see traces of blue thread-lock on the exposed threads, do not attempt to overcome the torque. Instead gently heat the screw tip with a soldering iron for 30s and this would gently loosen the thread-lock without creating damage.
- drop out the headlight assembly"


It seemed that these clips were impossible to place in with these LED lights since the blubs have a big fan behind them, but I used a pair of hemostats to hook the end of the wire retainer onto the proper loop.
NOT easy, but can be done so don't freak out and take your time.

I used 3M outdoor double sided tape to secure the small box for each bulb.
You DO NOT need the resistors supplied to circumvent the CANBUS system. They are not needed. I used zipties to tiddy up in there.


Following the previous directions in reverse will get everything buttoned up. Yes, you will probably need to re position the aim of these bulbs with the nobs after this install.
 
#101 ·
Here is a write up from my experiences in doing this LED install.
DO NOT expect to install these LED bulbs without taking a lot of plastic apart. It is probably possible, but for me I took the headlight assembly off.
First, I got the caps from Shapeways.com, which BlueSkip made (Remi). Use a dremel tool to remove the center material, View attachment 190722 then glue them in place. I used a two compound liquid glue. This took less than an hour to complete. View attachment 190714
View attachment 190730
Taking off all the plastic is not hard and only took me 45 minutes to complete. Here are the steps (from Blueskip):
"- remove the saddle
- remove the central cover from the airbox (fake tank alike) you DO NOT
-remove the two black plastic triangles (L&R) from each side of the gauges
-remove the low side fairings (L&R)
- remove the mirrors
-remove the up side fairings (L&R)
-remove the windscreen
- gently pop out the ambient air temp sensor support from the headlight block and leave it hanging from its harness
-turn CCW 90° the little running light support to remove it and leave it hanging from its harness
-gently pull straight out the headlight power connector (oval shaped) from the headlight block. It is connected between the two lights and has a 90° socket.
- unscrew the 4 screws that hold the headlight block onto the front structure. These screws are inserted from front towards the rear into some sort of aluminum clips. Warning: if you see traces of blue thread-lock on the exposed threads, do not attempt to overcome the torque. Instead gently heat the screw tip with a soldering iron for 30s and this would gently loosen the thread-lock without creating damage.
- drop out the headlight assembly" View attachment 190738
View attachment 190746
It seemed that these clips were impossible to place in with these LED lights since the blubs have a big fan behind them, but I used a pair of hemostats to hook the end of the wire retainer onto the proper loop. View attachment 190754 NOT easy, but can be done so don't freak out and take your time.

I used 3M outdoor double sided tape to secure the small box for each bulb. View attachment 190762 You DO NOT need the resistors supplied to circumvent the CANBUS system. They are not needed. I used zipties to tiddy up in there. View attachment 190770

Following the previous directions in reverse will get everything buttoned up. Yes, you will probably need to re position the aim of these bulbs with the nobs after this install. View attachment 190778
Well this turned out to be a PITA. I had a go at installing the Cyclops H7 bulb. Against my better judgement, I decided to start work 45 mins before sunset (I'm in an apartment so working on the drive outside). That turned out to be a mistake. The Cyclops bulb base dropped into the rear of the headlight housing when I was trying to put it in. Then the retaining clip disappeared. I have NFI where it is. I hope somewhere in the housing as I can't see it on the ground. %@%$.

I'll have to pull the headlight assembly out. Are there any step by step instruction anywhere? I looked and the quoted text is as best as I can find but after my bulb experience I could do with some more pics.

That also mentions blue thread locker on the last 4 screws holding the headlight assembly. Is that on all bikes or only some?