BMW F800 Forum banner

Adjusting the gear shift lever :o

25K views 52 replies 32 participants last post by  papasito  
#1 ·
A few weeks back I myself informed someone here that you could adjust the height of the gear lever, useful if you often miss from 1st to 2nd, for instance. When asked how it was done, I couldn't answer because I had this done by my dealer last year.

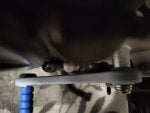
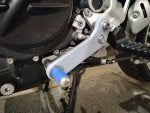
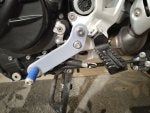
Now, I feel stupid because I want to raise the lever back a bit (new thicker boots) and I don't know how to do it. :eek: I see two small nuts at each end of the link to the box, but I'm not at all sure that's it, or what does what. Can someone explain? If you have a photo, that would be just fabulous. :) Thanks a lot.
 
#42 · (Edited)
Sorry for the bad screenshot.
Here is a little design I am doing for a dropped shifter (toe will be 35mm shorter). View is looking at it from the engine to the left (back view of the shifter). It is designed so that I don't have to change the heim joints length or where they sit on the spline.
Plan to 3d print it in resin to check the fit and function, and then probably send to a print bureau for 3D nylon PA12 print.

I would like to do the brake pedal as well, but that is one complicated piece(!). Maybe I purchase a scanner for that. The shifter was relatively easy to measure the governing dimensions.

Image
 
#43 ·
Kieth, if you are successful in this venture, I advise you to look up any Patents on this, and if there are none at all, then Patent your idea before anyone else can.

Otherwise, you may financially regret it. I know from personal experience.

Flook 😎
 
#44 ·
I suggest that you also look into product liability, especially re the brake, if you sell to the general public.
If someone stomps on the brake and it snaps and they run into a truck, you could be found liable
 
#47 ·
I love the effort that many of us take to make our bikes unique and to function better for us individually.
 
  • Like
Reactions: Flook
#50 ·
Did a test installation, only minor contacct with the protective sidestand sleeve. A short test ride revealed a need for loctite on the toe assembly, I will also substitute the stainless steel hardware for aluminum to eliminate any pendulum effect over large bumps.
 

Attachments